Part 7 - Hands On Project
Kubernetes for Beginners series

This article aims to explain Kubernetes (K8s) in a hands-on approach. It is going to be created a small project where data is produced from outside K8s cluster, processed by Spring Boot microservices and persisted in a MongoDB database. During all process, logs will be generated by the microservices and captured by Fluentd which will send those same logs to an elasticsearch server.
The project is constructed in 3 labs:
Lab 1 – ensures that all systems are working and connect with each other.
Lab 2 – shows how to hide sensible data and make it available for consumption by any service that requires it.
Lab 3 – demonstrates how to implement horizontal scalability.
The project was implemented with minikube under Windows 11 Home Edition and is available in this GitHub repository
The Project
The Producer is a simple Spring Boot application that generates random data.
The data is consumed by another Spring Boot called Consumer, its application to simulate some processing, sends data to a database and any logs generated are sent to a Log collector.

Fig. 1 - High level system design
Lab 1 - Initial implementation
In this stage we are going to create the system with the minimum enough to have it running and all services can communicate with each other.
All relevant files are in folder lab-01 in the git repository.
Architecture Design
It is a simple system, but to have all the services, in same place, in complex systems leads to difficulty in handling with different teams, projects and concerns. So, 3 namespaces where created: microservices, databases and monitoring. kube-system is already part of Kubernetes. The producer is a data creator and is supposed to run outside K8s and send data into it, simulating data coming from outside services.

Fig. 2 - Systems Architecture and tech stack
Both producer and consumer use Spring Boot 3 and communication is done by REST.
Data is stored in a MongoDB database. Log collection is performed by Fluentd and stored in a single node elasticsearch server. Logs are accessed through kibana.
Namespaces
In software development Namespaces are often used to organize and separate code. K8s also uses the same concept to organize services. We are using 4 namespaces:
Monitoring for elasticsearch and Kibana
Databases for MongoDB
Microservices for our Spring boot microservices
Kube-system is part of K8s and is used for its own components. We use it to run Fluentd We are using namespaces just to include some complexity like a real system.
In k8s, Namespaces are simple to create. Just create a manifest file:
apiVersion: v1
kind: Namespace
metadata:
  name: <namespace_name>
Code Block 1 - K8s Namespace manifest
In this project there's a file called namespaces.yaml with the 3 namespaces needed. Just run kubectl apply -f ./namespaces.yaml .
MongoDB Database
We are using MongoDB as our NoSQL database. It is going to be created with 2 users:
root - being the admin with its custom password
consumerUser - for the only purpose to be used by external apps to read and write in a single database "transactions"
StatefulSet will manage the Pod, because in the event of a Pod restart, there's the need to maintain all the gathered data.
This manifest has 2 containers:
container mongodb-app is where the actual MongoDB resides
initcontainer fix-permissions is started automatically as soon as the Pod has all required resources, starts before the container mongodb-app and has the function to change all folder permissions to be used by user 1001. This is needed because Bitmami's MongoDB runs with user id 1001.
ConfigMap mongodb-cm will provide createUser.js. This file will be placed in the container's /docker-entrypoint-initdb.d folder. This folder is a Bitnami's containers feature, used to place scripts needed to configure a service when starting the service for the first time. As MongoDb is running under a Statefulset attached to a VolumeClaim mongodb-pvc, when started by the first time, it will execute the scripts under /docker-entrypoint-initdb.d folder, but if started again it will not execute those files. createUser.js is needed because we want to create the user consumerUser and its "transactions" database.
PersistentVolume mongodb-pv, will create the folder /data/mongodb inside minikube's folder structure.

Fig. 3 - files and folders created by MongoDB
VolumeClaim mongodb-pvc will use the PersistenceVolume mongodb-pv to store MongoDB's files: databases, configuration files...
Service mongodb-svc is of type ClusterIp. It is K8s default type and provides connectivity to all applications/services inside the K8s cluster.
Service mongodb-np is of type NodePort. Provides access from outside the cluster to MongoDB. You just have to connect to port 30017 and it will redirect trafic to inside K8s to mongodb on port 27017.
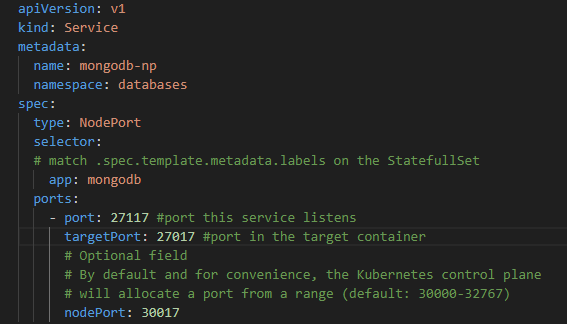
Fig. 4 - MongoDB's NodePort
In this tutorial we use Compass. Compass is a desktop application, meaning that it is used from outside K8s cluster to access MongoDB which is inside the K8s cluster. In order to Compass to access MongoDB use the K8s address and the nodePort. If using minikube just perform the following command to expose the nodePort:
minikube service mongodb-np -n databases --url
Code Block 2 - exposing MongoDB to outside minikube
This will output an url be used in Compass.
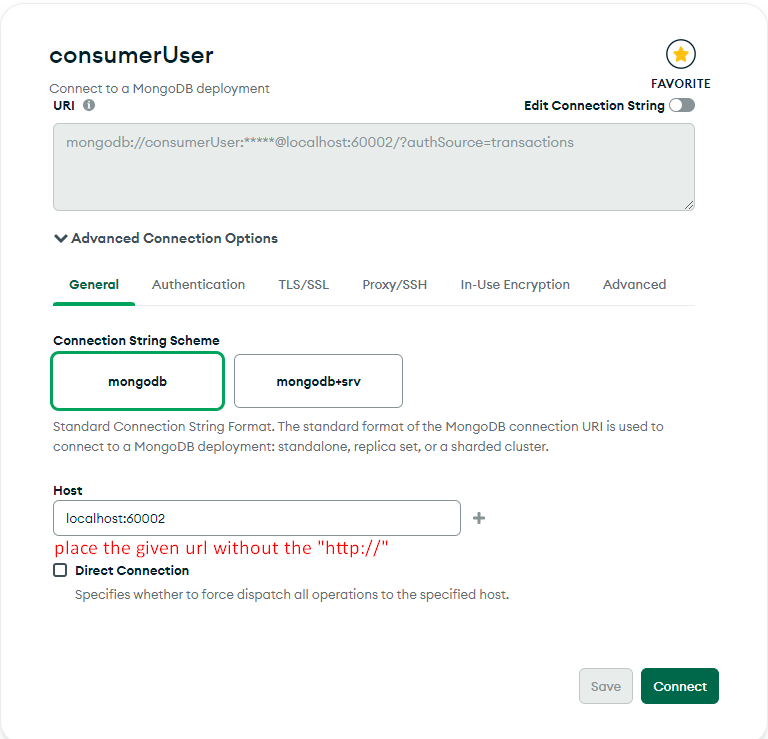
Fig. 5 - Setup connection to MongoDB: setting host address

Fig. 6 - Setup connection to MongoDB: setting user credentials

Fig. 7 - Setup connection to MongoDB: access successfull
Consumer Microservice
This is a simple Spring Boot application. It doesn't do any data processing but aims to receive data from Producer app, generate logs to be viewed in elasticsearch, store data in MongoDB.
Consumer app has 3 components:
Java application
Docker Image
K8s Deployment
Java application
Consumer is a simple REST microservice that receives from POST /transactions endpoint and sends it to MongoDB.
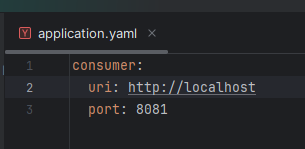
MongoDB connection string is defined in application.yaml file. There it can be seen the consumerUser's credentials are in plain sight. A thing which will be corrected in the next lab.

Fig. 8 - MongoDB connection string in Consumer application
How to setup and build the code, check the Readme.md in project's folder.
Docker Image
It was chosen to create a Docker Image and send it to a Docker repository and when the k8s cluster executes the Deployment, will push the image from Docker Hub.
The Docker file is located under consumer/docker folder.
The full process until sending the image to the Docker Hub takes 3 steps:
Compile
./gradlew bootJarBuild docker image locally
./gradlew task createImagePush image to docker repository
./gradlew task pushToDockerHub
The steps of building and pushing the Docker image to Docker Hub are defined by 2 gradle tasks: createImage and pushToDockerHub wich are defined in file build.gradle.kts. It is used gradle's feature to perform command line instructions to use Docker commands to perform all the operations.
K8s Deployment
A Deployment is used because the service doesn't store any data by its self. All the data is stored in MondoDB. When is installed in a K8s cluster will pull the Docker image from Docker Hub and run it. As it can be seen in the manifest, the Consumer app has the minimum enough to start and run, leading it may take some time to become ready to operate. That's why the readiness and liveness probes are configured with such a long time.

Fig. 9 - Consumer's resources and probes
The probes use Spring Boot Actuator to use specific endpoints related to Consumer's status.
Service consumer-np of type Nodeport is used to provide access to Producer app which is running outside the K8s cluster. It will tell to K8s cluster to reserve port 28081 and redirect external trafic to port 8081 on service with label transactions.consumer
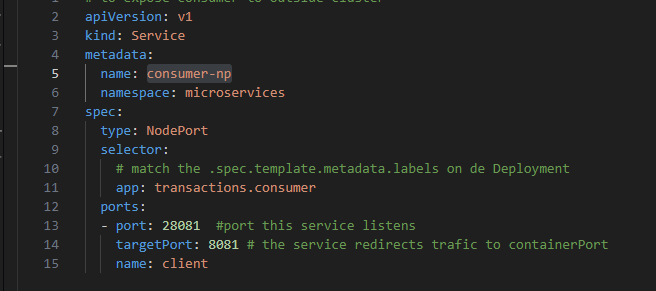
Fig. 10 - Consumer's NodePort manifest
if running on minikube, to expose this NodePort run:
minikube service mongodb-np -n databases --url
This will output a port number to be used by the Producer application to be able to send data to the Consumer inside K8s.
Producer Microservice
Is a Spring Boot application that generates random data. To execute it properly, first get the port from consumer's NodePort and fill the port property in application.yaml file. Then run ./gradlew bootRun and it will generate and send data to Consumer microservice.
elasticsearch
elasticsearch use is for storing log data for posterior analysis. In its internals it uses a temporal NoSQL database to store log data. More details about elasticsearch you can checkout at https://www.elastic.co/.
As elasticsearch is intended to store data (in K8s this is described has having state), then we select a Statefulset.
The Satefulset will associate the needed resources for elasticsearch to start and run. It uses the PersistentVolumeClaim elasticsearch-pvc wich points to the PersistentVolume elasticsearch-pv for its data storage needs. Uses the ConfigMap elasticsearch-cm to get the configuration properties needed to run. Service ClusterIP elasticsearch-svc will provide a reliable network address for all services to be able to establish communications with elasticsearch inside K8s cluster.
kibana
Kibana is a web application used to interact with elasticsearch. It's installed separately from elasticseearch beeing an independent service. Kibana has no need for any kind of storage so is managed by K8s by a Deployment object with one replica (one running Kibana instance).
As the Pod needs to be reached from outside of the K8s cluster it was created a NodePort object. In our setup, it was chosen the port management to the cluster, it will be selected any available port in the range 30000-32767. If it was needed to define a port by our self, just use the nodeport definition and if the selected port is free, it will be reserved to be used here. In order to access kibana from outside the cluster perform kubectl get svc kibana-np -n monitoring , the resulting output will give the cluster IP and the port assigned to be used.

Fig. 11 - Getting cluster's IP and nodeport to access Kibana from outside cluster
if running in K8s in minikube you only have to execute:

Fig. 12 - Accessing Kibana when K8s is running from Minikube
which will create a proxy to inside the Docker environment. You only have to open the browser on the given address.
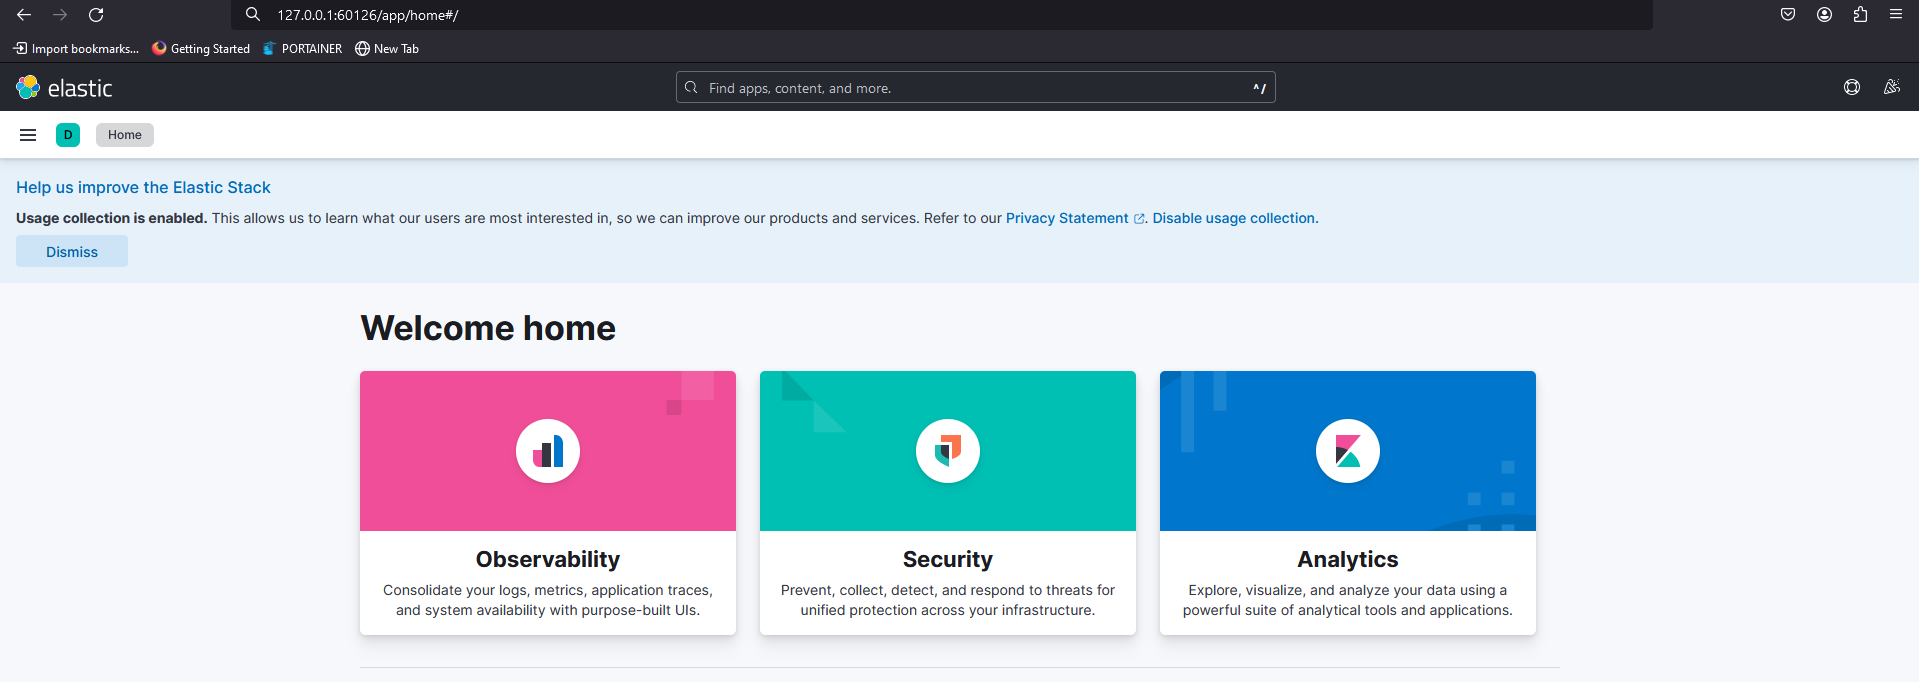
Fig. 13 - Accessing Kibana on given http address
Fluentd
Logs are generated by all the services (applications, databases ...) running inside the K8s cluster, but on any application is configured where the logs should go to be stored for posterior analysis. You can indeed, open a console on a specific container and check the logs there. But for a complex environment this becomes unmanageable. So Fluentd has the task to collect logs from all the services running in the K8s cluster, transform it if needed and send it to one or many repositories as needed. This works because the logs generated by the running services are written to stderr and stdout streams. Fluentd look at those streams, process the data and send it to a repository, in our case, elasticsearch.
To install Fluentd in a K8s cluster we must use a DaemonSet, because it ensures that Fluentd will be running in all the nodes of the K8s cluster. The DaemonSet defines a ServiceAccount. A ServiceAccount is a non-human account that allows to associate a role to the entity. The role is what will define what Fluentd can and cannot do in the clsuter, this is configured by a ClusterRole. To associate the ServiceAccount with the ClusterRole it is used a ClusterRoleBinding. The DaemonSet is designed to run services in a cluster role level, will associate a ServiceAccount with is associated permissions defined by the ClusterRole.
Put everything running
If properly configured, you'll get output similar like the following images.

Fig. 14 - Producer service generating data and receiving responses from Consumer service

Fig. 15 - Consumer microservice logs from the console
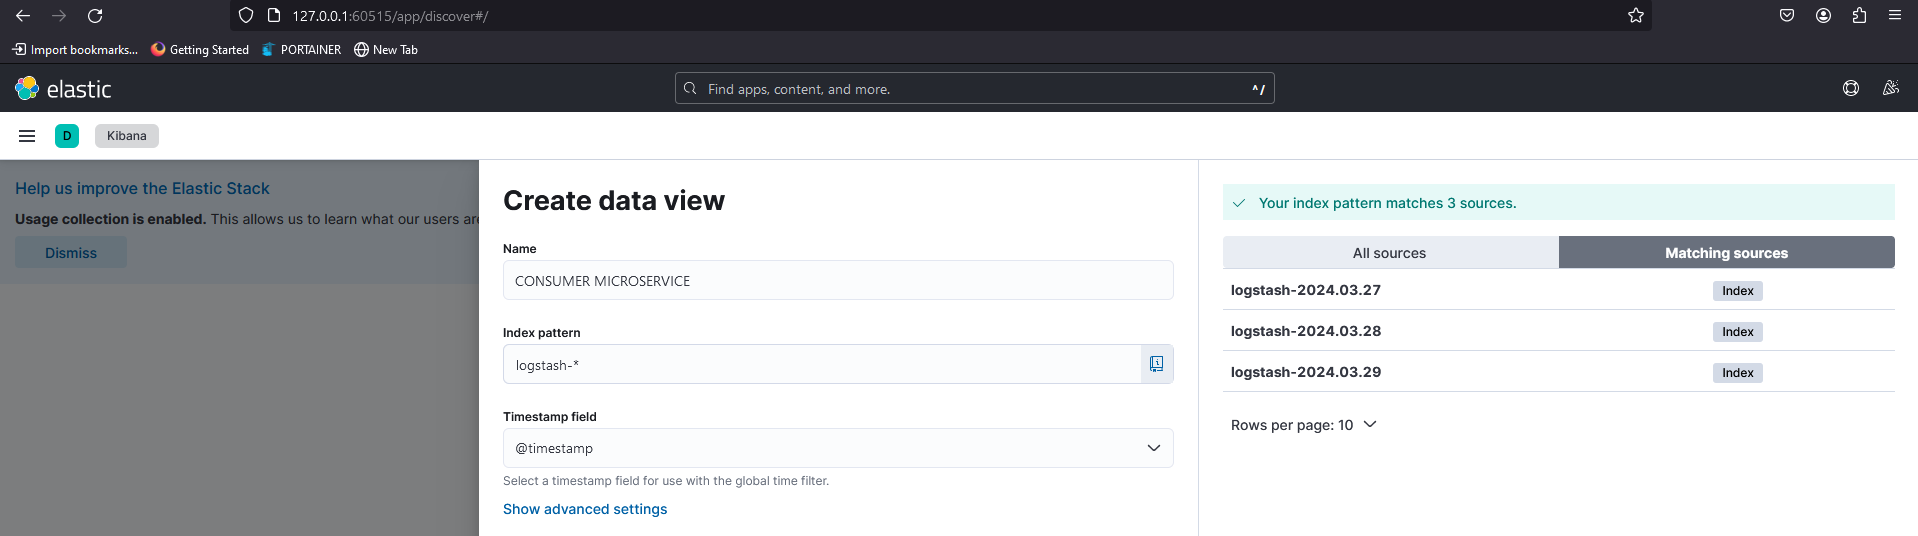
Fig. 16 - Create a data view to access logs on Kibana

Fig. 17 - Visualizing logs on Kibana

Fig. 18 - Using Compass to view data stored on MongoDB
Lab 2 - Applying Secrets
Protecting Sensitive Data in Kubernetes with Secrets
Every system stores sensitive data that needs to be used by services but must also be kept secure from unauthorized access. This includes preventing sensitive information like admin credentials from being exposed in places like Git repositories. In a Kubernetes environment, Secrets objects address this need.
Secrets vs. ConfigMaps: Tailored for Sensitive Data
While both Secrets and ConfigMaps store configuration data in Kubernetes, Secrets are specifically designed for sensitive information like passwords, API keys, and tokens. Unlike ConfigMaps, Secrets are not encrypted by default, but rather use base64 encoding.
Base64 Encoding: Obfuscation, Not Encryption
Base64 encoding is a technique that transforms binary data into a human-readable format using a 64-character alphabet. While it provides some level of obscurity, it's not true encryption. Anyone with access to the encoded data could potentially decode it back to its original form, especially if they know the encoding scheme.
Best Practices for Secure Secrets Management
Here's how to ensure the security of your Secrets in Kubernetes:
Minimize Reliance on Base64: Explore alternative mechanisms for managing highly sensitive credentials, such as service accounts or external secret management tools.
Rotate Secrets Regularly: Change passwords, API keys, and other sensitive information in Secrets frequently to reduce the vulnerability window.
RBAC and Access Control: Implement strong Role-Based Access Control (RBAC) to restrict access to Secrets based on the least privilege principle.
Monitor Secret Access: Keep an eye on your cluster for unauthorized attempts to access Secrets.
By following these practices, you can leverage Secrets effectively to manage sensitive data securely within your Kubernetes environment.
To create a Secret manifest, just open a command line and execute the appropriate command (works in linux, but if you are using Windows install Git Bash):
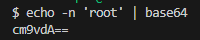
Fig. 19 - Converting string "root" to base64
Then we create a Secret manifest file and put the encoded data and perform kubectl apply -f <file name>.yaml . Only after this step the variables are available for consumption. One thing to be careful, is that the secrets can only be availabe in one namespace. In this lab all the Secrets where created in file secrets.yaml.
MongoDB
MongoDB has 2 user accounts to encode: the root and consumerUser. It was created 2 Secret manifest of type basic-auth. This type requires at least one of the keys username or password to be present.
apiVersion: v1
kind: Secret
metadata:
  name: mongodb-consumer-secret
  namespace: databases
type: kubernetes.io/basic-auth
data:
  # consumerUser
  username: Y29uc3VtZXJVc2Vy
  # consumer123
  password: Y29uc3VtZXIxMjM=
---
apiVersion: v1
kind: Secret
metadata:
  name: mongodb-root-secrets
  namespace: databases
type: kubernetes.io/basic-auth
data:
  #root
  username: cm9vdAo=
  #mongo123
  password: bW9uZ28xMjM=
Code Block 3 - Secret manifest for consumerUser and root users
To upload the secrets to our K8s cluster just perform
kubectl apply -f secrets.yaml
Code Block 4 - command to ulpoad secrets to K8s cluster
Now, let's update our MongoDB StatefulSet. To incorporate the root password securely, we'll leverage a Kubernetes Secret. We'll reference the secret by its name (mongodb-root-secrets) and the specific key within that secret where the password is stored (password).
env:
  - name: MONGODB_AUTH_ENABLED
    value: "true"
  # we can change the root user name if needed
  #- name: MONGODB_ROOT_USER
  #  value: root
  - name: MONGODB_ROOT_PASSWORD
    valueFrom:
      secretKeyRef:
        name: mongodb-root-secrets
        key: password
  - name: CONSUMER_USER
    valueFrom:
      secretKeyRef:
        name: mongodb-consumer-secret
        key: username
  - name: CONSUMER_PASSWORD
    valueFrom:
      secretKeyRef:
        name: mongodb-consumer-secret
        key: password
Code Block 5 - MongoDB's user accounts as secrets
For consumerUser it was done the same but used data from mongodb-consumer-secret , but for this user credentials are used in the file createUser.js provided by the ConfigMap mongodb-cm. As this file is executed by Node.js server, to access global variables we must precede the variable name with process.env..
use transactions;
var user = db.getUser(process.env.CONSUMER_USER);
if(user == null){
  db.createUser(
      {
          user: process.env.CONSUMER_USER,
          pwd: process.env.CONSUMER_PASSWORD,
          roles: [
              { role: "readWrite", db: "transactions" }
          ]
      }
  );
  print('User created');
}else{
  print('User already exists');
}
Code Block 6 - createUser.js using consumerUser credentials as environment variables
❗Important
Before applying this MongoDB's manifest you must install MongoDB from scratch. This is needed because all the content in /docker-entrypoint-initdb.d folder is executed only at first MongoDB's install, a simple restart will not work.
How to do:
scale down to zero
kubectl scale statefulsets mongodb -n databases --replicas=0delete all MongoDB's files from the volume
If running the cluster with minikube do:minikube ssh sudo rm -R /data/mongodbreplace existing manifest with the new one
kubectl replace -f mongodb-stfset.yaml
Consumer Microservice
For the Consumer Microservice we must create a new Secret. Indeed we are using the same consumerUser account, but a Secret can only be used if in the same namespace as the service that is using it, so we create the secret in microservices namespace.
apiVersion: v1
kind: Secret
metadata:
  name: mongodb-consumer-secret
  namespace: microservices
type: kubernetes.io/basic-auth
data:
  # consumerUser
  username: Y29uc3VtZXJVc2Vy
  # consumer123
  password: Y29uc3VtZXIxMjM=
Code Block 7 - Secret for consumerUser in microservices namespace
Updated the Consumer Microservice manifest with Secrets references.
env:
  - name: CONSUMER_USER
    valueFrom:
      secretKeyRef:
        name: mongodb-consumer-secret
        key: username
  - name: CONSUMER_PASSWORD
    valueFrom:
      secretKeyRef:
        name: mongodb-consumer-secret
        key: password
Code Block 8 - Consumer Microservice Deployment with its Secrets
As these values are used in MongoDB's connection string in application.yaml, we must replace the values with their correspondent environment values:
spring:
  data:
    mongodb:
      uri: mongodb://${CONSUMER_USER}:${CONSUMER_PASSWORD}@mongodb-svc.databases.svc.cluster.local:27017/transactions
      database: transactions
Code Block 9 - Consumer Microservice's application.yaml referencing environment values
Another place where we should remove credentials is in gradle.properties where Docker credentials to upload the image reside. As this configuration is more relevant to be managed by a CI/CD environment, it would be out of this tutorial context to remove them.
elasticsearch and Kibana
Elasticsearch has 2 user accounts to be moved to Secret: admin and kibana and for them it was created 2 Secrets manifest: elasticsearch-secrets and kibana-secrets.
apiVersion: v1
kind: Secret
metadata:
  name: elasticsearch-secrets
  namespace: monitoring
type: kubernetes.io/basic-auth
data:
  #elastic
  username: ZWxhc3RpYw==
  #elastic123
  password: ZWxhc3RpYzEyMw==
---
apiVersion: v1
kind: Secret
metadata:
  name: kibana-secrets
  namespace: monitoring
type: kubernetes.io/basic-auth
data:
  #kibana123
  password: a2liYW5hMTIz
Code Block 7 - Secrets manifest for elasticsearch and Kibana
Updated elasticsearch-stfset.yaml as in the folowing code block:
env:
...
    - name: ELASTIC_USERNAME
      valueFrom:
        secretKeyRef:
          name: elasticsearch-secrets
          key: username
    - name: ELASTIC_PASSWORD
      valueFrom:
        secretKeyRef:
          name: elasticsearch-secrets
          key: password
    - name: KIBANA_SYSTEM
      valueFrom:
        secretKeyRef:
          name: kibana-secrets
          key: password
Code Block 8 - elasticsearch manifest with user account's values from secrets
Kibana uses the ConfigMap kibana-cm to configure the user account to access elasticsearch. It is not possible to apply a Secret into a ConfigMap with the tools provided by K8s. But it is possible to do so with a tool like Helm, but that would fall out of this lab context. So Kibana's ConfigMap will remain untouched.
Lab 3 - Achieve Horizontal Scalability
When we talk about scalability, we mean how to allow for our systems execute their tasks with increasingly loads. This can be achieved in two ways:
Vertical scalability, where RAM and/or CPU are adjusted on demand and workload and the pod number is fixed. In K8s this is done with Vertical Pod Autoscaler (VPA)
Horizontal scalability where it is created or destroyed Pods according with needs but each Pod resources are constant. In K8s this done with Horizontal Pod Autoscaler (HPA).
In this Lab we will implement HPA because is the most used scaling technique.
Implementing HPA offers one added challenge. As the load increases, the number of Pods will grow, so how to distribute traffic between all the Pods? And when the load decreases, the pod number will also decrease. How to manage traffic in this situation. The solution to direct traffic to any live Pod automatically is to implement a Load Balancer.

Fig. 20 - Load Balancer redirecting traffic from a Producer and 3 Consumer Mircroservices
A Load balancer is exactly that, a tool to redirect traffic between microservices. Theres some algorithms to manage beeing the most simple the Round Robin as depicted in Fig. 20. The Load Balancer incomming traffic will be sent to each microservices by turn.
So to successfuly implement a scalable soluiton in K8s we have to take implement two things:
a Load Balancer service to redirect traffic between all relevant Pods
an Auto scalling service to create or destroy Pods dinamicaly and accordingly to a specified metric
Create Load Balancer Service
K8s doesn't provide a Load Balancer, but minikube does. To create one, implement a manifest as seen in file consumer-lb.yaml and perform kubectl apply -f consumer-lb.yaml. Just make sure that you delete the consumer-np NodePort : kubectl delete svc consumer-np -n microservices . This is needed, because a Load Balancer also connects to port number in a k8s cluster node and we are using the same NodePort.
apiVersion: "v1"
kind: "Service"
metadata:
  name: consumer-lb
  namespace: microservices
spec:
  selector:
    #matches deployment spec.template.labels
    #meaning the pods names
    app: transactions.consumer
  type: LoadBalancer
  ports:
    - name: http
      port: 8081
      targetPort: 8081
      nodePort: 30081
      protocol: TCP
Code Block 9 - LoadBalancer Service for Consumer microservices
Then in consumer-dpl.yaml file change the replicas number to 3 and peform kubectl replace -f consumer-dpl.yaml and you should get something like this:

Fig. 21 - Consumer microservices managed by the LoadBalancer
As we are using minikube we need to do the follwoing steps in order to expose the LoadBalancer to our host:
create a tunnel:
minikube tunnel
Check the external IP:
kubectl get svc -n microservices

- update producer's application with the proper external IP and 8081 port
If everything is configred properly, it will appear in Kibana the logs generated by each microservice as it can be seen in the next 3 figures.

Fig. 22 - Logs generated by Consumer Microservice consumer-dpl-c77875bc4-mqq94
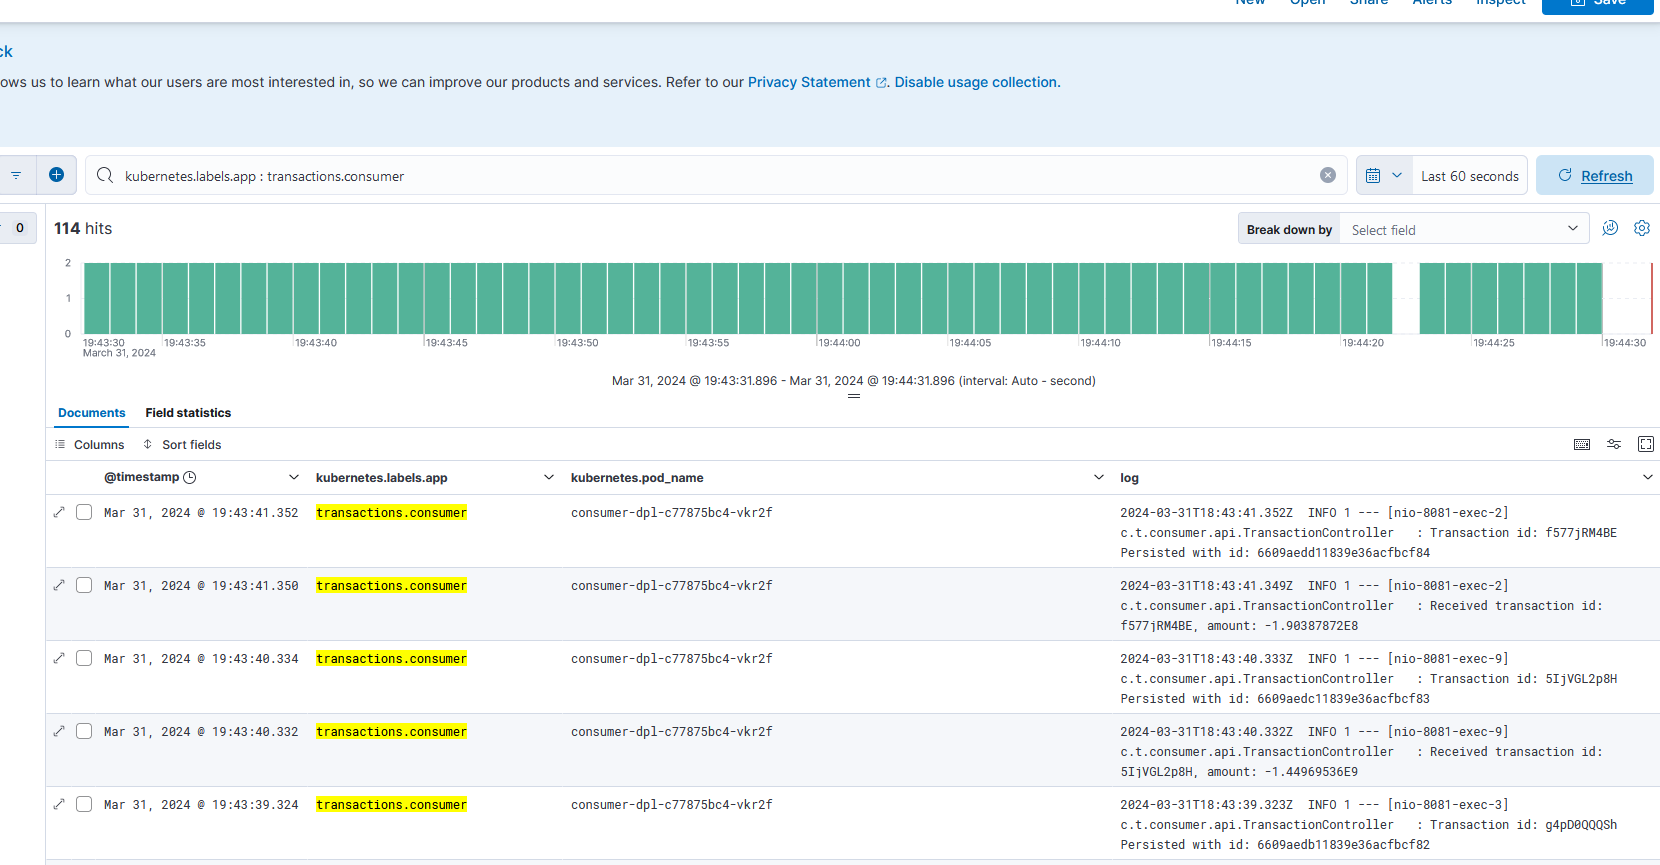
Fig. 23 - Logs generated by Consumer Microservice consumer-dpl-c77875bc4-vkr2f
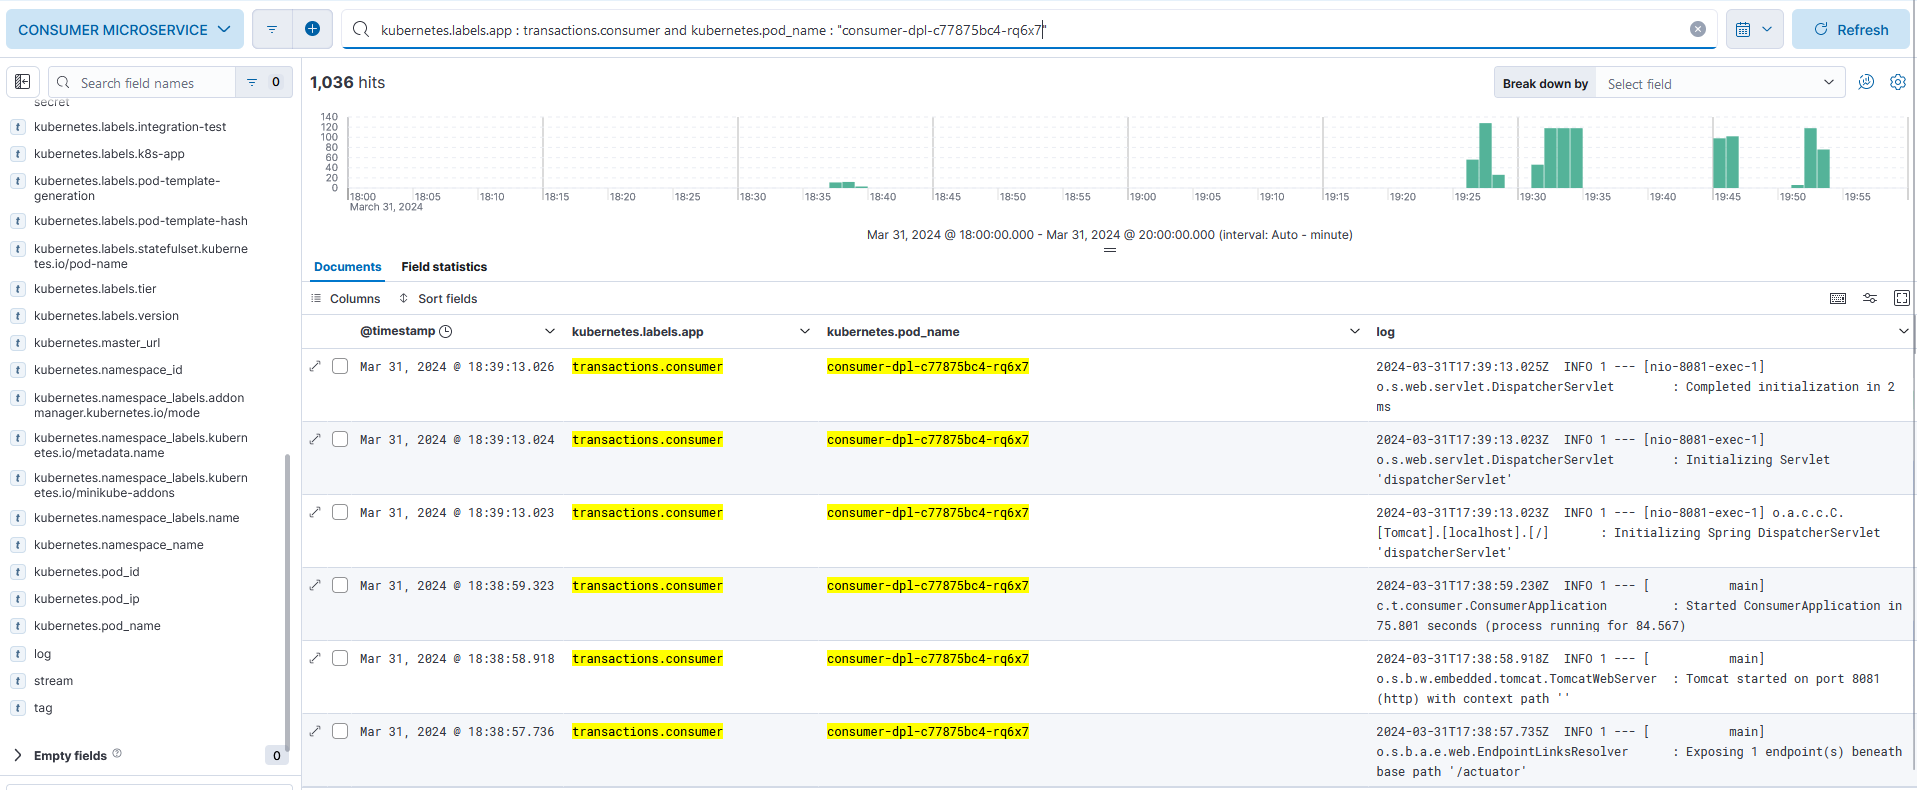
Fig. 24 - Logs generated by Consumer Microservice consumer-dpl-c77875bc4-rq6x7
Create Horizontal Pod Autoscaller service
Creating an HPA service in K8s is like any other K8s object. Create a manifest file and use kubectl to create it in our K8s cluster.
Code Block 10 shows the HPA in consumer-hpa.yaml used in this lab. As the HPA controls a Deployment, .spec.scaleTargetRef.name must match the Deployment's name and also .metadata.namespace must match the namespace as the Deployment.
apiVersion: autoscaling/v2
kind: HorizontalPodAutoscaler
metadata:
 name: consumer-hpa
 # the namespace must be the same of the Deployment
 namespace: microservices
spec:
 scaleTargetRef:
    apiVersion: apps/v1
    kind: Deployment
    # must match Deployment's .metadata.name
    name: consumer-dpl
 minReplicas: 1
 maxReplicas: 10
 metrics:
    - type: Resource
      resource:
        name: cpu
        target:
          type: Utilization
          averageUtilization: 10
Code Block 10 - HPA manifest
We have made our replicas to be between 1 and 10 and as a reference metric we used the average CPU utilization of all Pods to 10%.
Before creating our HPA object in our cluster we took view of our Pods: Fig. 25 and Fig. 26.

Fig. 25 - Consumer microservices running before applying HPA manifest

Fig. 26 - Consumer microservices cpu average before applying HPA manifest
Created HPA in our cluster: kubectl apply -f consumer-hpa.yaml and HPA immediately killed 2 Pods as expected because there’s no workload at this time.

Fig. 27 - Consumer microservices running right after applying HPA manifest

Fig. 26 - Consumer microservices cpu average right after applying HPA manifest
Started the Producer application and waited a few seconds and observed the Pod number increased to 8 and the CPU average is 27%. HPA increased the Pod number as expected and by the CPU average (Fig. 28) it is expected to increase even more.
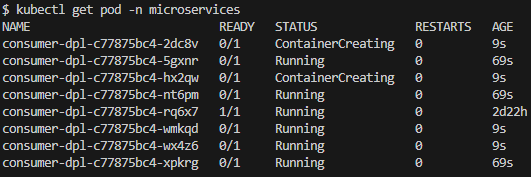
Fig. 27 - Pods creation, 20 seconds after Producer start

Fig. 28 - CPU average utilization 20 seconds after Producer start
Awaited about 20 minutes and the Pod number increased to 10 witch is the defined maximum (Fig. 29) and looking at the CPU average (Fig. 30), i it still is above the average CPU utilization of 10 defined in the manifest. But as HPA was configured to a maximum of 10 replicas, no more Pods will be created.
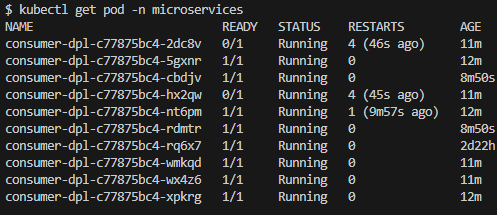
Fig. 29 - Pod listing, 20 minutes after Producer start

Fig. 30 - CPU average utilization, 20 minutes after Producer start
After stoping the Priducer, the Pod count is slowly decreasing to a minimum of 1.

Fig. 31 - Pod listing, 5 minutes after Producer stop

Fig. 32 - CPU average utilization, 5 minutes after Producer stop
Conclusion
As soon as the concepts of Pod and Containers are understood, Kubernetes becomes an easy platform to deploy any application and connect to each other. Scalability is easily achievable as is incorporated in K8s. Services auto heal themselves as long probes are configured properly.
References
[1] “Logging Architecture,” Kubernetes. Available: https://kubernetes.io/docs/concepts/cluster-administration/logging/. [Accessed: Mar. 29, 2024]
[2] “Using RBAC Authorization,” Kubernetes. Available: https://kubernetes.io/docs/reference/access-authn-authz/rbac/. [Accessed: Mar. 29, 2024]
[3] “Service Accounts,” kubernetes.io. Available: https://kubernetes.io/docs/concepts/security/service-accounts/. [Accessed: Mar. 29, 2024]
[4] “DaemonSet,” Kubernetes. Available: https://kubernetes.io/docs/concepts/workloads/controllers/daemonset/. [Accessed: Mar. 29, 2024]
[5] “StatefulSets,” Kubernetes. Available: https://kubernetes.io/docs/concepts/workloads/controllers/statefulset/. [Accessed: Mar. 29, 2024]
[6] “Deployments,” Kubernetes. Available: https://kubernetes.io/docs/concepts/workloads/controllers/deployment/. [Accessed: Mar. 29, 2024]
[7] “Secrets,” Kubernetes. Available: https://kubernetes.io/docs/concepts/configuration/secret/. [Accessed: Mar. 29, 2024]
