
Spring Cloud Data Flow
Part 1 - Create a Stream Data pipeline with pre-made SCDF Applications


Abstract
This is the 1st part of a series dedicated to Spring Cloud Data Flow (SCDF). Here it will be explained how to create a simple SCDF Stream application just to show how to interact with SCDF. The Stream will perform a simple operation, receive a data input, transform data and show the transformed data in a log. In this GitHub repository, it can be found a docker-compose set of files with all the resources needed to run and experiment with Spring Cloud Data Flow.
Why use Spring Cloud Data Flow
SCDF is a convenient service from Spring that allows you to create a pipeline and schedule tasks (called jobs). The developer creates a data pipeline with a series of steps, where each step is a Spring Boot microservice. Each microservice can be allocated resources independently of the other steps as long there are enough resources. The Developer's only concern is to create the data pipeline and SCDF will execute and manage everything else.
SCDF allows the creation of a permanent data pipeline called STREAM or the creation of Scheduled Jobs. All are managed by SCDF.
The setup of the pipeline is done using boxes in a low code style. SCDF already has some pre-made applications for each step of the pipeline or job and all are configurable.
Installing SCDF
Spring Cloud Data Flow is easy to install on a local machine as long as Docker is available. You can follow the instructions from SCDF site [1] or use the setup from my GitHub repository for a customized setup based on docker-compose, just follow the instructions there.
Installing SCDF Pre-made Applications
SCDF Applications are Spring microservices aimed at performing a single operation. They come in 4 categories:
source - for receiving or generating data;
processors - for processing/transforming data;
sink - for storing data in a repository like a database or an AWS S3 bucket;
other - for any function that doesn't fit in the others;
SCDF has a set of pre-made applications that can be downloaded to your SCDF environment.
To install the pre-made applications:
Open a browser on the address http://localhost:9393/dashboard

Fig. 1: Add a pre-made SCDF Application
Go to Applications and click on the "Add Applications" button.

Fig. 2 - Import Stream Starters for Kafka
Select the 1st option and click on the "Import Applications(s)" button. This will import several pre-packaged applications for data stream pipelines.
The Hello World Stream Application
We are building a Stream Event application that receives HTTP requests, process data and send them to log. For that, it will be created a Stream application with 2 components HTTP Source and a Log Sink
The HTTP Source will receive REST messages, those messages will be converted to upper case by the transform Processor, pass the transformed data to the Log Sink which creates log entries.

Fig. 3 - Hello World Stream data pipeline
Step By Step Development
As this is an application aimed to process data as soon as it arrives it will be created as a SCDF Stream.

Fig. 4: Create SCDF Stream
After pressing the "Create Stream(s)" button it will appear a new view as seen in Fig. 5, be dedicated to configuring our new SCDF Stream app.

Fig. 5: Create SCDF Stream User Interface
This new view is composed of 3 sections:
a text console where a user can type the name of the microservices needed for the operation at hand;
a set of drag-and-drop boxes, with all the applications available for a user to create an SCDF Stream;
a graphical user interface for constructing the SCDF Stream
Both the graphical user interface and the text console, have the same functionality and can be used interchangeably.
Setting http Source
By clicking on the HTTP box, you will have access to two actions:
Delete - to delete the box:
Options - to configure the resource;

Fig. 6 - http actions: Options and Delete
Click on Options to start the configuration and fill in the items as in the following figures:
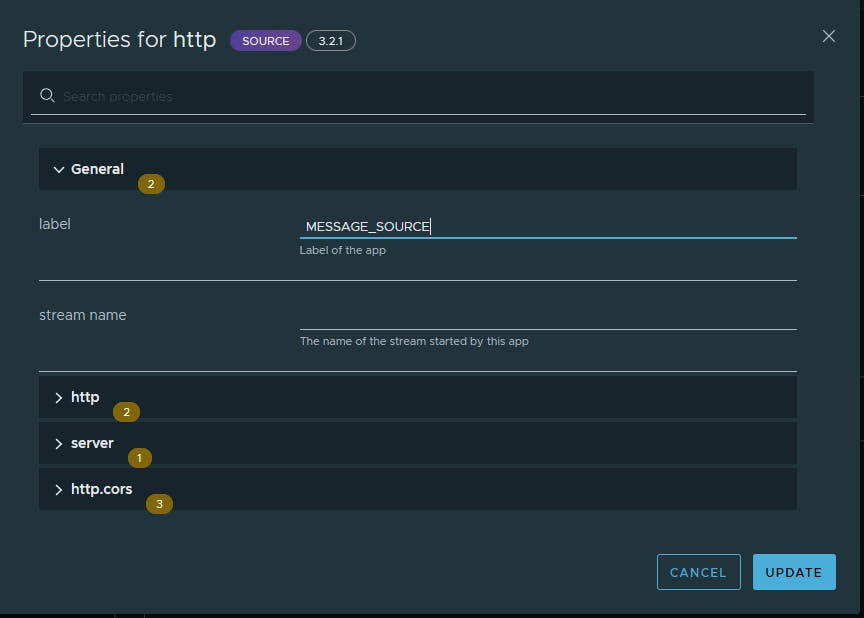
Fig. 7 - Setting General tab of http Source
label - the name given to this HTTP source
stream name - function unknown
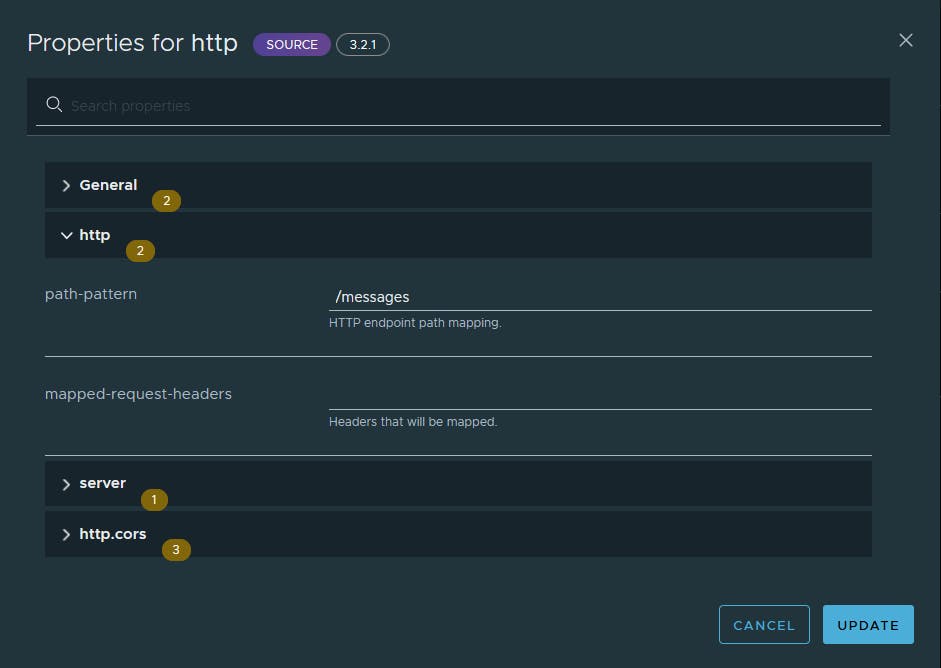
Fig. 8 - Setting http tab of http Source
In this tab it is configured the endpoint to be created on the SCDF Skipper Server to receive the events:
path-pattern - the http Source will listen on /messages endpoint
mapped-request-headers - the request headers that must come

Fig. 9 - Setting http source port
- port - This is the port that a service must use to connect to send data. In this case, we're using port 20000
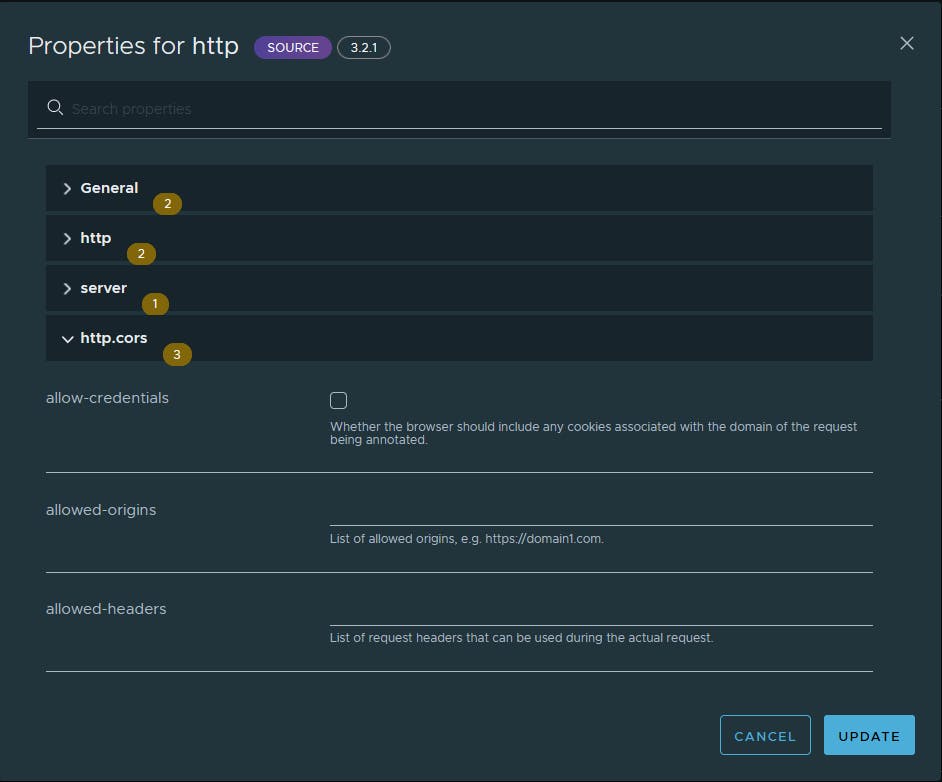
Fig. 10 - Setting http.cors tab for HTTP Source
For this project, there's no need to implement any kind of security, so we will keep it all in the blanks.
After pressing the "Update" button the user is returned to the previews view, where it can be seen the HTTP box and the console user interface updated with the new changes as seen in Fig. 11.

Fig. 11 - http Source after setup
The HTTP source box will appear with the name given by the label and the name of the topic that was configured on the stream settings.
Setting transform Processor
Click on Transform Processor and then click on Options.

Fig. 12 - The TRANSFORM box
Give a name to the TRANSFORM box.

Fig. 13 - Setting the label for the TRANSFORM Processor
- label - the name to give to this TRANSFORM processor

Fig. 14 - Setting expression: convert to uppercase
- expression - the transformation to apply to received data. In this case, to convert to uppercase.
After pressing the Update button you will return to the initial view and get something like this:

Fig. 15 - The stream after all is setup
Setting the log Sink
For our purposes, there's nothing relevant that it is needed to do for the log sink to work.
We are going only to give it a label. The process is the same as the others.

Fig. 16 - Setting the log Sink
Click on the log Sink and click on Options.
It will present the setting box.

Fig. 17 - Log Sink's General tab settings
- label - the label for this sink. It will be used just LOG
On the log tab, we will leave it empty.
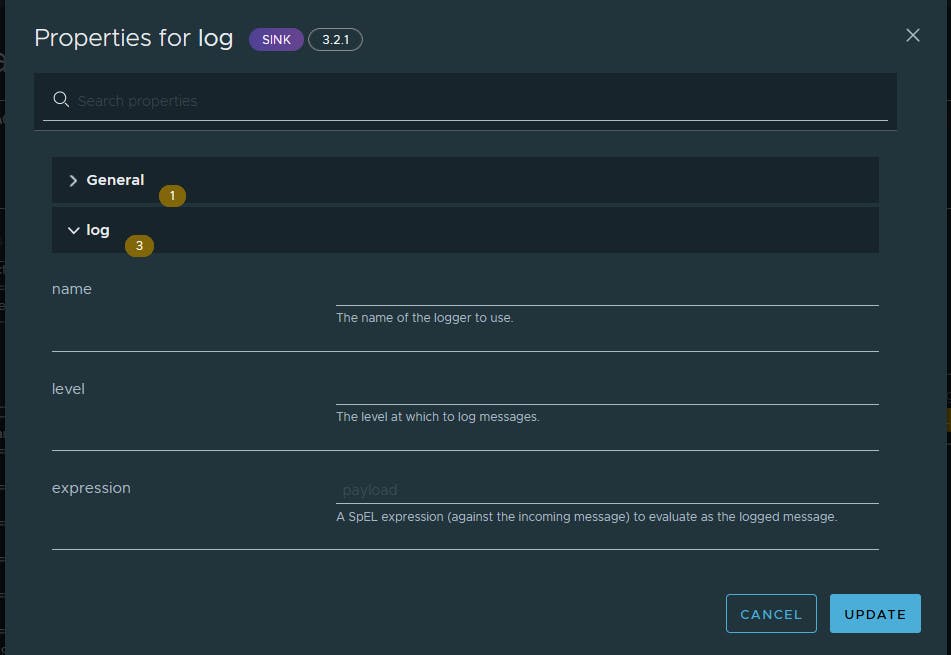
Fig. 18 - log Sink's log tab settings
Clicking on the "UPDATE" button, will save the changes and return to the "Create stream(s)" view.

Fig. 19 - The Stream ready to create
By pressing the "Create Stream(s)" button, the stream will be created.

Fig. 20 - Setting the Stream's Name and Description

Fig. 21 - Stream created
As can be seen in Fig. 21, the stream when created appears in the Streams list and is in status "UNDEPLOYED".
Deploy the Stream
Click on the 3 vertical dots on the left then Click on Deploy in the menu.
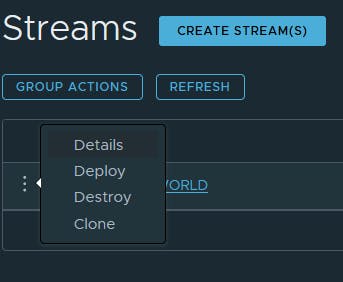
Fig. 22 - Initiating the deployment process of a Stream
Fig. 23 shows the next step of deploying an SCDF Stream. Has you may recall, each component of an SCDF Stream is a Spring microservice, so you can allocate resources individually.

Fig. 23 - Setting properties for the running Stream
For demonstrating purposes we will use de default values. Click "Deploy the Stream Button".
You will be shown the Stream with the status "Deploying".

Fig. 24 - HELLO_WORLD Stream status after clicking on Deploy
As the status may not be updated in the view when it changes, click on the "Refresh" button to see the updated status.

Fig. 25 - HELLO_WORLD Stream status after clicking on the "REFRESH" button
Using Stream
Use Postman or similar and set the request like in Figure 26 and send it.
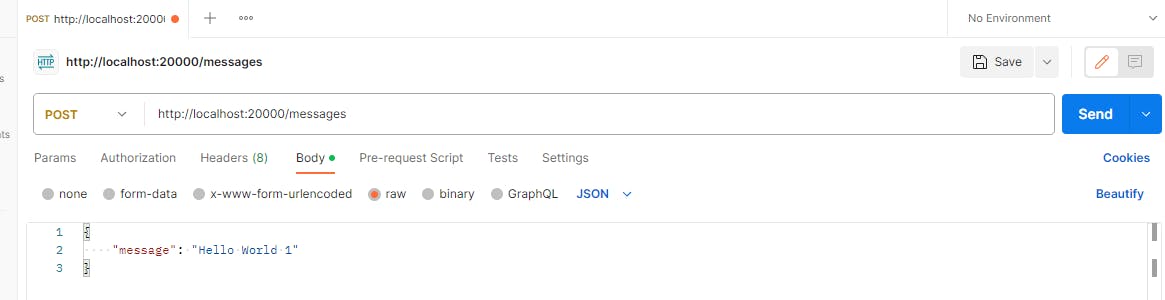
Fig. 26 - Preparing a request
Getting back to the Stream list on your browser, left-click on HELLO_WORLD stream and you will be presented with a view similar to this:

Fig. 27 - Details of Stream HELLO_WORLD
By opening the log of the LOG Synk, it can see all the logs produced by it and by scrolling down it will be seen the transformed data.

Fig. 28 - The transformed message
Provided with the Docker Compose that comes with this tutorial comes a web application that allows querying Kafka systems.
Open your browser on the address localhost:8080 and click on the Topics button on the left bar.
You will be presented with a view similar to Fig. 29. It can be seen the topics created by each component of our HELLO_WORLD pipeline: MESSAGE_SOURCE and TO_UPPERCASE. There's no HELLO_WORLD.LOG because that component is a terminal component not generate data for a forward step.

Fig. 29 - Topics list of HELLO_WORLD
Fig. 30 shows the message received by the HTTP source called MESSAGE_SOURCE. The component received the message and put it in the Kafka topic HELLO_WORLD.MESSAGE_SOURCE to be consumed by the next step's component.
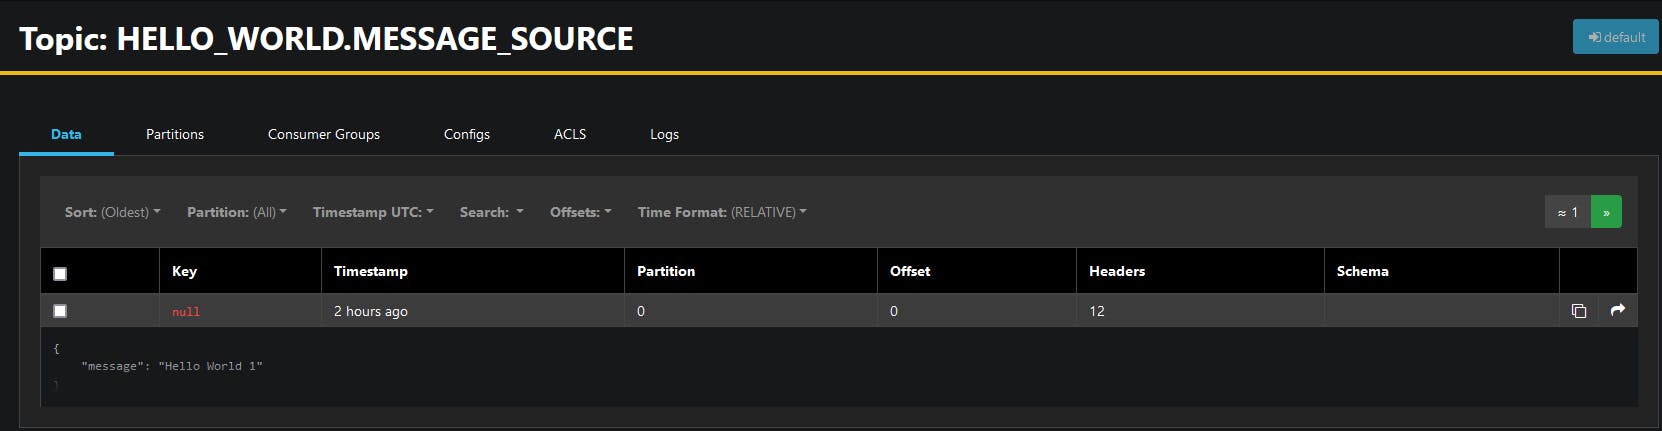
Fig. 30 - Message on HELLO_WORLD.MESSAGE_SOURCE topic
The next step is to convert to uppercase. The transform module as soon as the new message arrives to topic HELLO_WORLD.MESSAGE_SOURCE it will process it put the output in the HELLO_WORLD.TO_UPPERCASE Fig. 31 shows exactly that.

Fig. 31 - Message transformed to uppercase on HELLO_WORLD.TO_UPPERCASE topic
How It Works
As was seen in the previous chapters, the modules are Spring Boot microservices. All the setup is managed by SCDF and we only have to configure how the modules communicate with each other and each module's main task.
But how do they communicate? This is done using a messaging system, in our case Kafka.
Each module will create a Kafka topic where the output of each is saved, to be consumed by the posterior module.

Fig. 32 - Consumer Groups created by the Stream HELLO_WORLD
Opening http://localhost:8080 in a browser will open the AKHQ web app, a user interface for Kafka messaging systems.
By clicking on the Consumer Groups button on the left panel in the AKHQ web app, it will open a page like in Fig. 32. It can be seen that created a Consumer Group with the id HELLO_WORLD and this consumer group is composed of 2 topics: HELLO_WORLD.MESSAGE_SOURCE and HELLO_WORLD.TO_UPPERCASE.
So the stream name will create a Consumer Group with that same name and the topics related to that name will have the format <SCDF stream name>.<module's label>.
References
[1] VMware, “Installation,” Documentation | Spring Cloud Data Flow. https://dataflow.spring.io/docs/installation/ (accessed Aug. 15, 2023).
[2] VMware, “Stream Development,” Documentation | Spring Cloud Data Flow. https://dataflow.spring.io/docs/stream-developer-guides/ (accessed Aug. 18, 2023).